
The theme for this week’s CASEing the Catty design challenge is your favourite project from the annual catalogue. Unfortunately life got busy this week and I didn’t get my project finished in time for the design team blog hop, but I thought I would share it with you anyway.
On page 127 of the annual catalogue, we have a stunning bundle called the Arrange a Wreath bundle. I think it makes the most beautiful cards and projects, but for me I am most drawn to it for making christmas wreaths.

Since I haven’t bought this bundle yet, I set about creating some wreaths with the dies I already own. For both of the wreaths I have combined the colours Pear Pizazz, Garden Green, Old Olive and Shaded Spruce. The red holly berries are cut from Real Red using the one of the dies in the new Poinsettia dies in the August-December mini catalogue going live on the 4th August.
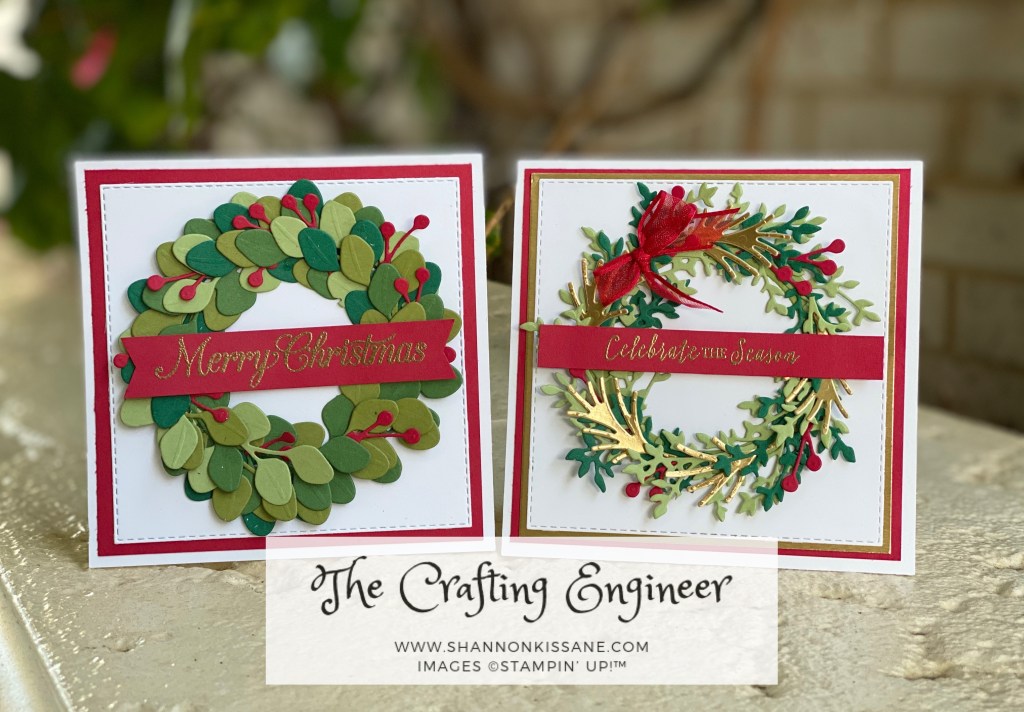
For my first card I have used the large leaf die in the set In the Woods. This is a gorgeous die set (that coordinates with the Winter Woods stamp set) that carried over from last year’s holiday catalogue.
I used the stitched rectangle dies to create a stitched square in the size that I needed (in this case its about 4″ x 4″). If you haven’t done this before, it involves die cutting twice. The first pass you cut the top of the square and part way down the sides, and then you shift the die down to align with the bottom edge of where you want it and then cut from the sides down to the bottom. Whilst I have done this many times before, in the past I have always measured the size I needed and drawn some pencil lines to ensure I moved the die down to the correct size when I cut the second time. This time I discovered something so simple I’m not sure why I haven’t done it this way before. All I did was cut a square of cardstock with my trimmer to something a smidge bigger than the stitched square I needed. in this case I cut a square that was about 4 1/8″ x 4 1/8″. Then when you place the die you just line it up, and when it comes to moving it you just slide it down to the bottom. No pencil lines or extra measuring required!

To finish the card I added a Real Red mat, and then a Merry Christmas sentiment that was heat embossed in gold onto Real Red card. The sentiment is from the new Poinsettia Petals stamp set.
For my second card I die cut the large tree from the Sweet Silhouette Dies and then just snipped off the branches. In addition to the holly I also added some gold sprigs cut from the Mini Curvy Keepsake Dies.
In addition to the red mat, I also added an additional gold foil mat on this card for something extra special. The sentiment comes from the set Itty Bitty Christmas – a set that is available right now as it’s in the annual catalogue after carrying over from last year. Finally I added a bow tied with some new Real Red Sheer ribbon (in the upcoming August-December mini catalogue).

A good tip for you when making wreath cards, I create a circular base to start with by using the layered circle dies. But prior to cutting out the circle I use an adhesive sheet on the card stock. That way my circular base has some sticky on it to get me started. Starting on a base also ensures I end up with a reasonable circular shape.
I hope this encourages you to use what you already have when it comes to creating, the first option doesn’t have to be ‘buy something new’. Which card is your favourite? Leave me a comment below and let me know.


