
What do you do when you leave it till the day before someone’s birthday to order them their new phone? I guess some people might say “Hey, We’ve bought you a new phone, it will be here next week”. But me – I make a paper one and disguise our dis-organisation in cute packaging!
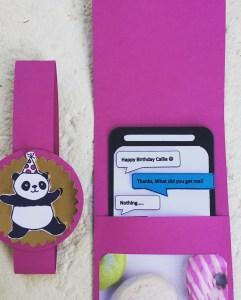
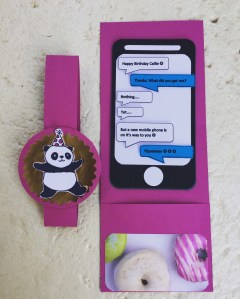
The whole project was very simple to make. In fact the part that took the longest was getting the font size right for the text bubbles. These were created using a standard text bubble shape in MS Word and then printed out onto card stock. I cut them out and adhered them using dimensionals to give a bit of texture and interest.
You could make the phone any size you wanted, for mine the black card stock is 5″ x 2 3/4″. The white ‘screen’ card stock is cut to 2 1/5″ x 3″. All the corners have been rounded. The button on the bottom is a 1/2″ circle and the strip at the top is just free cut. In hindsight I think this strip should have been a bit shorter but oh well.

Once I was finished making the phone I decided it needed something a little more so I cut a piece of grey card that was only slightly larger than the black, maybe 1/8″ bigger. I stuck the phone to this grey piece using dimensionals. The photo above was before I attached the extra piece of grey card.


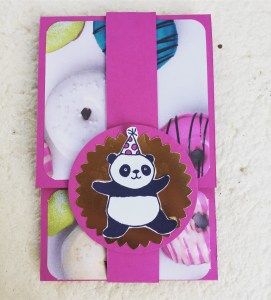
The gift card holder is one that I have made a few times now, of varying sizes. I got the original idea from Jackie Bolhuis (check it out here), and I just adapt the size to what I need. For this one I just measured how long the phone was, doubled it and add around half an inch or just over to allow for the dimension and not having to squeeze it in there. For the width, I measured the width of the phone and added 3/4 of an inch. Score it in two spots to make your flaps. On the bottom flap add a strip of adhesive on both the sides (don’t make this a really fat strips of glue else your card / phone won’t fit), and then fold the flap up to make your pocket. Add some DSP to the front of the flaps, slide on a belly band and decorate however you like. Jackie has a video on her website showing how these are made – honestly they are so quick and simple and look really good.


Absolutely fantastic !!!
LikeLike
Thanks mum 😄
LikeLike