

Welcome to the first team blog hop for the 2018-2019 Annual Catalogue! Who are the Midnight Inklings you might be asking? Well we are an Australian based team of Stampin’ Up Demonstrators with team members in almost all states of Australia. If you have never visited my site before – welcome! It’s lovely to have you.
This blog hop is all about featuring brand new products in the recently launched catalogue. There are so many amazing things in this catalogue it was hard to pick just one, so my project today uses some new designer series paper (DSP) and also two new stamp sets.
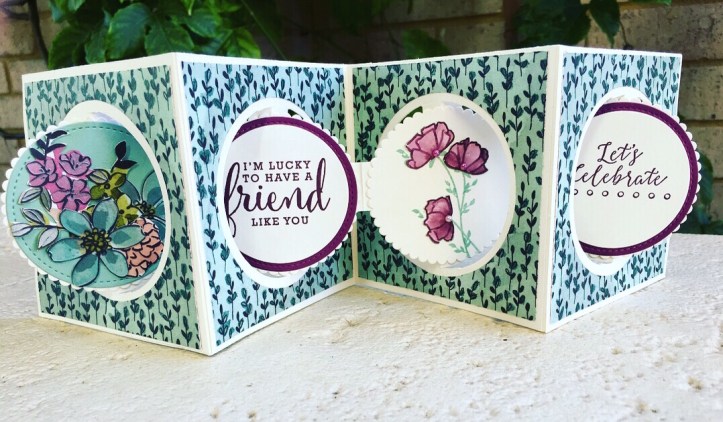
The card I have made to share today is called an accordion style card. I have seen lots of these on pinterest using non Stampin’ Up dies that do all the cutting, partial cutting and scoring for you, but I wanted to have a go at this style using only what is available in the new catalogue. I spent a fair bit of time zooming in on various photos to get the central folding correct, and I think I managed it. This post is going to be a long one as I want to include details on how I put this all together – just warning you 🙂
I’ll start by listing the materials and measurements of everything I have used (the links to all the products are at the end of this post. The circles and scallops are from the layering circle framelits unless otherwise stated:
- Very Vanilla card stock 10cm x 10cm – 8 pieces (4 pieces with the 2nd largest circle cut from the centre, 4 pieces with the 2nd largest circle partially cut out, see details below)
- Very Vanilla card stock 10cm x 2.5cm – 3 pieces
- Share What You Love Speciality DSP 9.5cm x 9.5cm – 8 pieces (all with largest circle cut from centre)
- Very Vanilla card stock 3rd largest scallop – 8 pieces
- Very Vanilla card stock 4cm x 1.5cm – 3 pieces
The following items were used to decorate my inner scallops, so depending on your style and what you like you may not need all of these.
- Very Vanilla card stock 4th largest circle – 2 pieces
- Rich Razzleberry 2nd largest stitched circle – 2 pieces
- Mint Macaron 2nd largest stitched circle – 1 pieces
- Share What You Love Speciality DSP – scraps for fussy cutting flowers
- Artisan pearls
- Love What You Do stamp set
- Detailed with Love stamp set
- Make A Difference stamp set
Wow – that seems like a lot, and I guess it is a bit more than normal – but this is not your normal card – it’s a little more fancy!

Below is a step by step on how I put everything together – if something isn’t clear or you want more details feel free to contact me anyway you like. I’m happy to help. If the details aren’t of interest to you right now, bookmark this page for later and instead scroll down for the pretty photos and hop on over the next blog.
1. When working with circles within circles it is really important that everything line up or the card won’t work and definitely won’t close properly. You could use this same technique with squares or ovals, anything you like really. Just make sure everything lines up. To get this right I created two templates for die cutting. I cut my first template to 10cm x 10cm and then used a ruler and pen to find the centre point. I marked in some measurement lines so that I was able to get my circle die (2nd largest circle die) as close to centred as possible and then cut it out. Remove the cut circle, and place the die back onto the template so that it fits perfectly in the hole (it pops in nicely). Use a bit of washi to secure. Then place the template over a piece of very vanilla 10cm x 10cm card and run through the big shot. Do this on 4 of the 10cm x 10cm squares – they will all come out perfectly lined up. Set these frames aside.
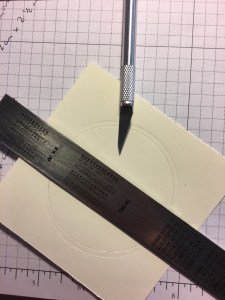
2. The next 4 pieces of 10cm x 10cm very vanilla card require the circle to only be partially cut out as you need a strip of card down the middle to secure the insides of the card later. To do this you need to place some strips of scrap card stock (1.5cm wide) between the die and the card you want to partially cut. I liked to slide the strip under the die on the template and line it up centrally, then place all of it on top of the card you want to cut.


Once you have partially cut all 4 pieces of card, use a craft knife and ruler to slice vertically to remove the bits that are not needed. I forgot to take a photo of what this looks like when done so I drew a sketch to help. What is shown in the image on the right in grey should be what you have left, your square of card with a circle that is mostly cut out but has a central strip still there. The bits shown in white in the sketch can be discarded. Set these frames aside.
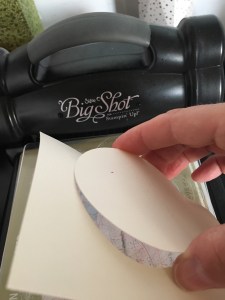

3. Create a template similar to the one above, but this time on a 9.5cm x 9.5cm square and use this to cut a centred circle (using largest circle die) from all 8 pieces of the DSP. Set these aside.


4. Score the 10cm x 2.5cm Very Vanilla strips down the middle and fold. Use these to join the frames with the centre steps together. This is now the base of your accordion card. Be sure to make sure you alternate the direction the steps fold so that the card will fold neatly, but also make sure that all your joining strips end up on the same side of card. The side that the strips are stuck to will be covered completely – so if you have ended up with one side of your frames looking a bit dodgy you can use this step to hide it.
5. Stick the remaining 4 frames over the tops of the now joined frames to both hide the joins, and also give some extra structure to the card.
6. Glue the DSP to the front and back of the frames, you should end up with a small very vanilla outer edge border, as well as a small border around the the centre cut out.
7. The final step for the outside of the card is a little fiddly but not that hard. You need to score the centre strip down the middle. I did this by placing the panel onto my stampin trimmer, lining up the centre with the trimmer groove, and then using my bone folder to score. The trimmer scoring blade didn’t work so well due to the thickness of all the layers. If you have a score board you could use that. Working on your panels left to right, on the left hand one use your snips to cut along the centre strip from the right to the centre score line at the top and bottom. For the next panel snip from the left to the centre score line. For the next go from the right, and the final go from the left. Fold along each of the score lines, pushing the cut bit backwards. It is this ‘free / cut’ part of the centre strip that you will attach the inside panels to. The outside of the card is now complete, put it aside till later.
For the inside circles, you can really decorate how you you please, so perhaps not even step I did is required for you, or maybe you will make yours even more elaborate. Take the idea and run with it how you like.
8. Join four of the scalloped circles together using the 4cm x 1.5cm strips. 1.5cm width worked well for my scallops, and then length can be anything you want really – it will be hidden. But you do want it to be sturdy. Before attaching them I scored and folded each of the strips at the 2cm mark. Again – keep all your joining strips to the same side of the scallops and you also want these to fold like an accordion, so alternate the fold direction.
9. Glue the remaining four scallops onto the ones you have just joined together to hide the joins. Take some time to line up the ‘scallops’ so it looks neat.
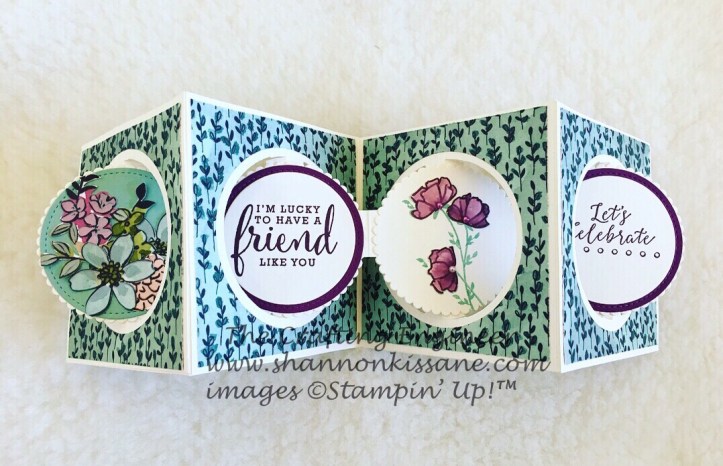
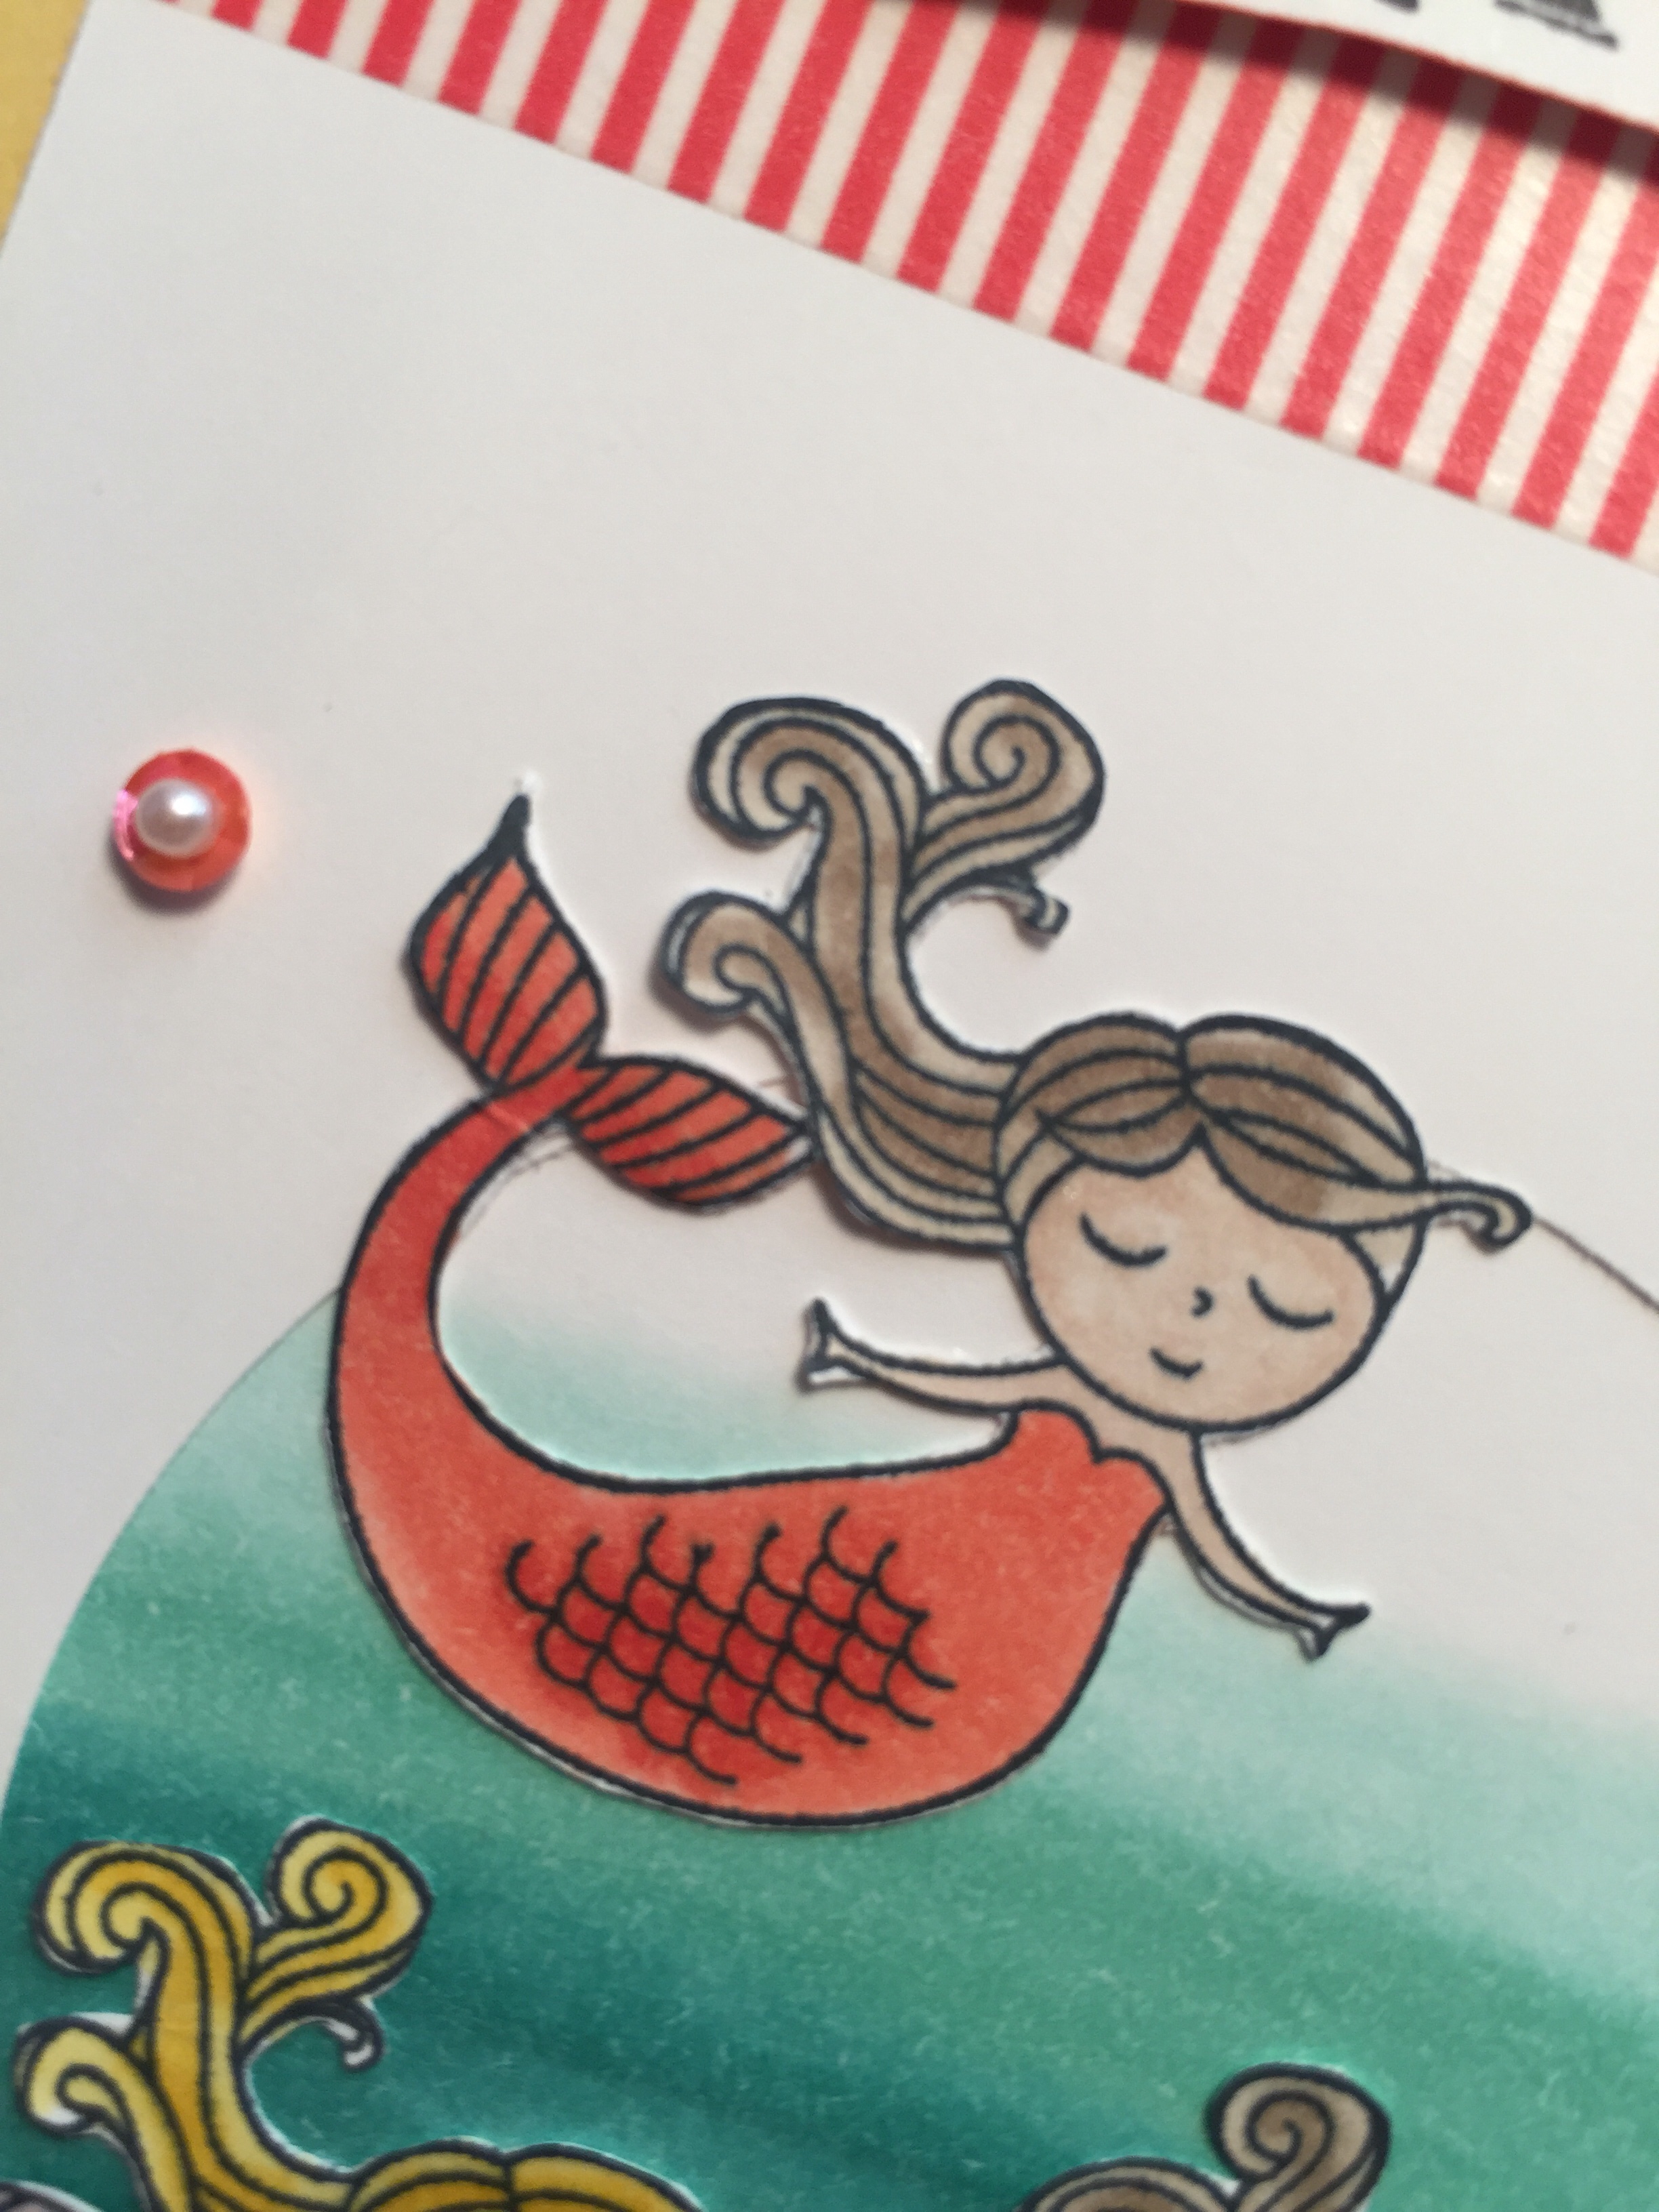
10. Decorate the scallops any way you like. On my first one (this will be the front of the card when it is all compressed in an envelope) I added a mint macaron stitched circle and then layered some flowers I had fussy cut from the DSP. For the second one I stamped “I’m luck to have a friend like you” onto a circle of very vanilla and then layered that onto a stitched circle in rich razzleberry. For the third I stamped the flowers from the Love What You Do stamp set in mint macaron. I stamped them again in rich razzleberry on some scrap, coloured the flowers using an aqua painter and then cut them out to stick onto the card. I also added some leaves to the flowers using the very small leaf in the Make a Difference stamp set. I finished it with a few artisan pearls. On the final scallop I stamped “Let’s Celebrate” from the Detailed with Love stamp set onto a circle of very vanilla, and again matted this on a stitched circle in rich razzleberry.

11. Once all the decorating is complete you need to attach the inside scallops to the outside frame, gluing only on the half of the centre strip that is folded back. This is important – if you glue on the wrong half (or on the whole centre strip) your card won’t open properly. Prior to glueing I suggest having a bit of a fold and play to make sure everything is going to line up. Particularly your front piece as this will be what you see when you fold the card. When I did it, I used liquid glue and put some (don’t use heaps or it will ooze and you will end up sticking something you shouldn’t) on the bent back centre piece on the front panel. Place the front scallop into position, pressing it into the glue. Wait for it to be dry and secure and then weave the other pieces into position, glueing as you go. It is fiddly, but take your time to let the glue dry between panels so that you are able to fold it up each time you glue to make sure it lines up. And you’re done! The photos below show the front and the back when it is folded up.


Sorry this was such a long post, but I wanted to get in all the details so that you can give these a try yourself. I would love to see how you go and what you come up with. If you liked this card, leave me a comment. I appreciate and love to read them all 🙂
Next up on the hop is the amazingly talented Michelle, you are going to love what she has created.


Midnight Inklings Team Blog Hop – New Annual Catalogue 2018 – Participant List
3: Shannon Kissane (You Are Here)
Product List


Shannon, your accordion style card looks awesome! I would love to try to make one, thanks for the detailed instructions. Sharni Haines. x
LikeLiked by 1 person
Thank you Sharni x
LikeLike
Great accordion card, Shannon! It looks amazing! So much work has gone into it but I’m sure the lucky recipient will love it.
LikeLiked by 1 person
Thank you, it was a bit of work but I had been planning on trying it for a while now – so it was a good excuse 🙂
LikeLike
Wow Shannon, that is beautiful and will definitely be coming back to have a look and make one of these gorgeous cards. Very impressed.
LikeLiked by 1 person
Thanks Jodi 🙂
LikeLike
Shannon, your card is a SUPER WOW card, Thanks for sharing it.
LikeLiked by 1 person
Thank you Sue 😊 I really appreciate the comment x
LikeLike
Absolutely amazing card Shannon ! I really lo e everything , the design , the way you decorated it and the colours M
LikeLiked by 1 person
Thank you so much for the lovely words Cheryl, I’m glad you liked the card 🙂
LikeLike
Amazing card! I plan on making one today – translating into inches! Just absolutely gorgeous!!
LikeLiked by 1 person
Can’t wait to see how you go. I’m sure it will be stunning 🙂
LikeLike
Wow! Extraordinary!! I love it and all your amazing instructions – I’m going to have to try myself now. Thanks for joining in on our Midnight Inklings blog hop today. x C
LikeLiked by 1 person
Thanks Carolyn 🙂
LikeLike